

Introduction
This is the second installment in an article about aliasing and oversampling. If you missed the first, check it out!
Removing Aliasing with Anti-Aliasing Filters
Here’s a question: if I blow a dog whistle, even though I can’t hear it, won’t that get into the DAC and put aliasing nonsense into my sampled signal? Yes it will! There are all sorts of high frequencies we can’t hear that mics pick up or synths create. If they are above Nyquist, all of them will alias and make our recording sound terrible. Enter: anti-aliasing filters. Their sole job is to attenuate frequencies that are above the Nyquist frequency of the sample rate and let lower frequencies pass through (they are low-pass filters). Let’s update our digital recording steps from earlier:
- Air vibrates
- Microphone diaphragm picks up vibrations
- Diaphragm creates electric current
- Current goes through preamp in your audio interface
- Preamp passes to ADC
- ADC applies an analog anti-aliasing filter*
- ADC samples the filtered signal
- The interface passes the samples to the computer, which prints a file
* In Delta-Sigma modulation, the ADC uses a digital filter for this purpose while converting your signal from a very high sample rate at 1-bit to a lower sample rate at 16 or 24 bits. Different method, same issue!
Because all the frequencies above Nyquist have been greatly attenuated by the filter, aliasing is no longer audible! We call the resulting signal band-limited, because the frequencies you’d use to mathematically describe it are limited to bands that are below the Nyquist frequency. Here’s the takeaway:
Anti-aliasing filters must be applied in either the continuous, analog domain or higher sample-rate signal before sampling down to a lower rate, because aliasing is a mathematical problem that occurs during sampling itself. You cannot remove aliasing after you’ve sampled down!
Reconstructing a Signal from Samples
So far, we’ve been walking familiar ground for battle-hardened engineers and producers, but here’s something about digital audio a lot of people don’t think about: how does the DAC turn a series of discrete samples back into a continuous signal? How do these dots get connected? Does it just… make them up? It might surprise you to know that the answer is (usually) another analog low-pass reconstruction filter. Here’s the way a simple DAC might work:*
- The DAC converts each sample into a flat electrical pulse.
- The DAC pushes the pulses into an analog low-pass filter.
- The filter is low-pass, its output cannot jump from value to value quickly (fast movement = high frequency). The output signal smoothly moves between pulses to reconstruct the continuous signal.
* A Delta-Sigma DAC converts your high bit-depth, low sample rate data (such as 24-bit, 44.1 kHz) to low bit-depth, high sample rate data (1-bit, 30 Mhz+). This technique filters twice on the way out: one digital low-pass filter to do the conversion smoothly, then a tamer analog low-pass filter to remove the quantization noise caused by that conversion.
If you have a system with both an ADC and DAC, it’s possible they use identical filters for anti-aliasing on the way in and reconstruction on the way out! Just like their anti-aliasing counterparts, reconstruction filters vary in type and quality. This is another big takeaway:
Digital audio is reconstructed into analog audio through a low-pass filter on your listener’s hardware. You don’t know the characteristics of this filter, but most of them are decent enough. When audio manufacturers, developers, or standards bodies make claims about precision that might affect your processing or purchasing decisions, remember that you must always consider that your listener’s DAC may render those claims unimportant, or even wrong.
How Much is Lost in Sampling and Reconstructing Signals?
This may come as a surprise, but theoretically, it’s not lossy! We have a stellar mathematical theory that proves the case: the Nyquist-Shannon sampling theorem (shout out to Whittaker, too). The theorem proves that as long as a signal is band-limited, meaning its harmonic content does not exceed Nyquist, we can sample and reconstruct that signal perfectly. It’s the mathematical proof for why anti-aliasing filters are necessary.
When recreating the continuous signal from your band-limited sampled signal, the theory shows that if you replace each individual sample with a whole sinc function centered at the same place in time as that sample, scaled by the sample value, and sum all of these sinc functions together, you can recreate your continuous signal perfectly. If you’ve been deep in audio technical stuff, this technique might remind you of convolution!
In reality, sinc functions run infinitely forwards and backwards in time. It’s impossible for a machine to do the math, because it would require infinite calculations. So engineers approximate this process, most commonly using the method previously discussed: send electrical pulses to an analog low-pass filter whose impulse response closely approximates a sinc function. Whatever process your DAC is performing, it’s meant to approximate Nyquist-Shannon reconstruction. While nothing is perfect, most DACs are close enough that we can’t tell the difference. The closer it is, the higher the quality, which is why audiophiles shell out big bucks for standalone DACs!
Linear vs. Non-Linear DSP
OK, so now we have a basic understanding of how audio gets into the digital domain and comes back out without aliasing. Great! Let’s talk about one way to classify digital signal processes (DSP) that happens in the computer: linear vs. non-linear.
Linear processes do not affect the frequencies in your signal, and they follow a couple simple rules:
- Additivity – adding two signals and then processing them gives the same result as processing each signal by itself, then adding them.
- Homogeneity – increasing the strength of the input proportionately increases the strength of the output.
If a process does not follow both rules, it is non-linear, which means it changes the shape of the signal, and therefore alters its frequencies. If new frequencies show up above Nyquist, you’ve introduced aliasing into your sampled audio signal. If you want to go deep, see this article from CCRMA, but here are some examples of typically linear and non-linear processes:
|
Process |
Linear |
Non-Linear |
|
Gain |
X |
|
|
Clean EQ (both linear phase and minimum phase) |
X |
|
|
Delay |
X |
|
|
Reverb |
X |
|
|
Creative EQ (like a console channel emulation) |
|
X |
|
Compressor |
|
X |
|
Saturation/Distortion |
|
X |
|
Tape emulation |
|
X |
|
Clipper |
|
X |
There are all sorts of things out there and they don’t always follow these rules, but it’s a handy starting point. And here’s a handy takeaway:
If any of your plugins use non-linear processing, they are introducing new frequencies, and potentially aliasing, into your signal. If this content is above Nyquist, and it’s loud enough to hear, you can mitigate it with oversampling.
Oversampling is not the only way to lessen aliasing, and not all aliasing is loud enough to care about. After all, you cannot completely remove it, just push it farther and farther down into the quiet beyond. But this general rule should guide you!
Why Oversampling Helps, and How it Works
A short overview of why oversampling works:
- Non-linear DSP adds frequencies above Nyquist, causing aliasing.
- Increasing the sampling rate increases Nyquist, so we do that before the DSP, increasing frequency headroom for the DSP.
- We low-pass the oversampled signal after non-linear processing to eliminate the new frequencies that will be above the Nyquist frequency of our original, lower sample rate.
- Finally, downsample the signal back to the original rate. Less aliasing!
Sounds great in theory, but how do we do it? Let’s look at some techniques.
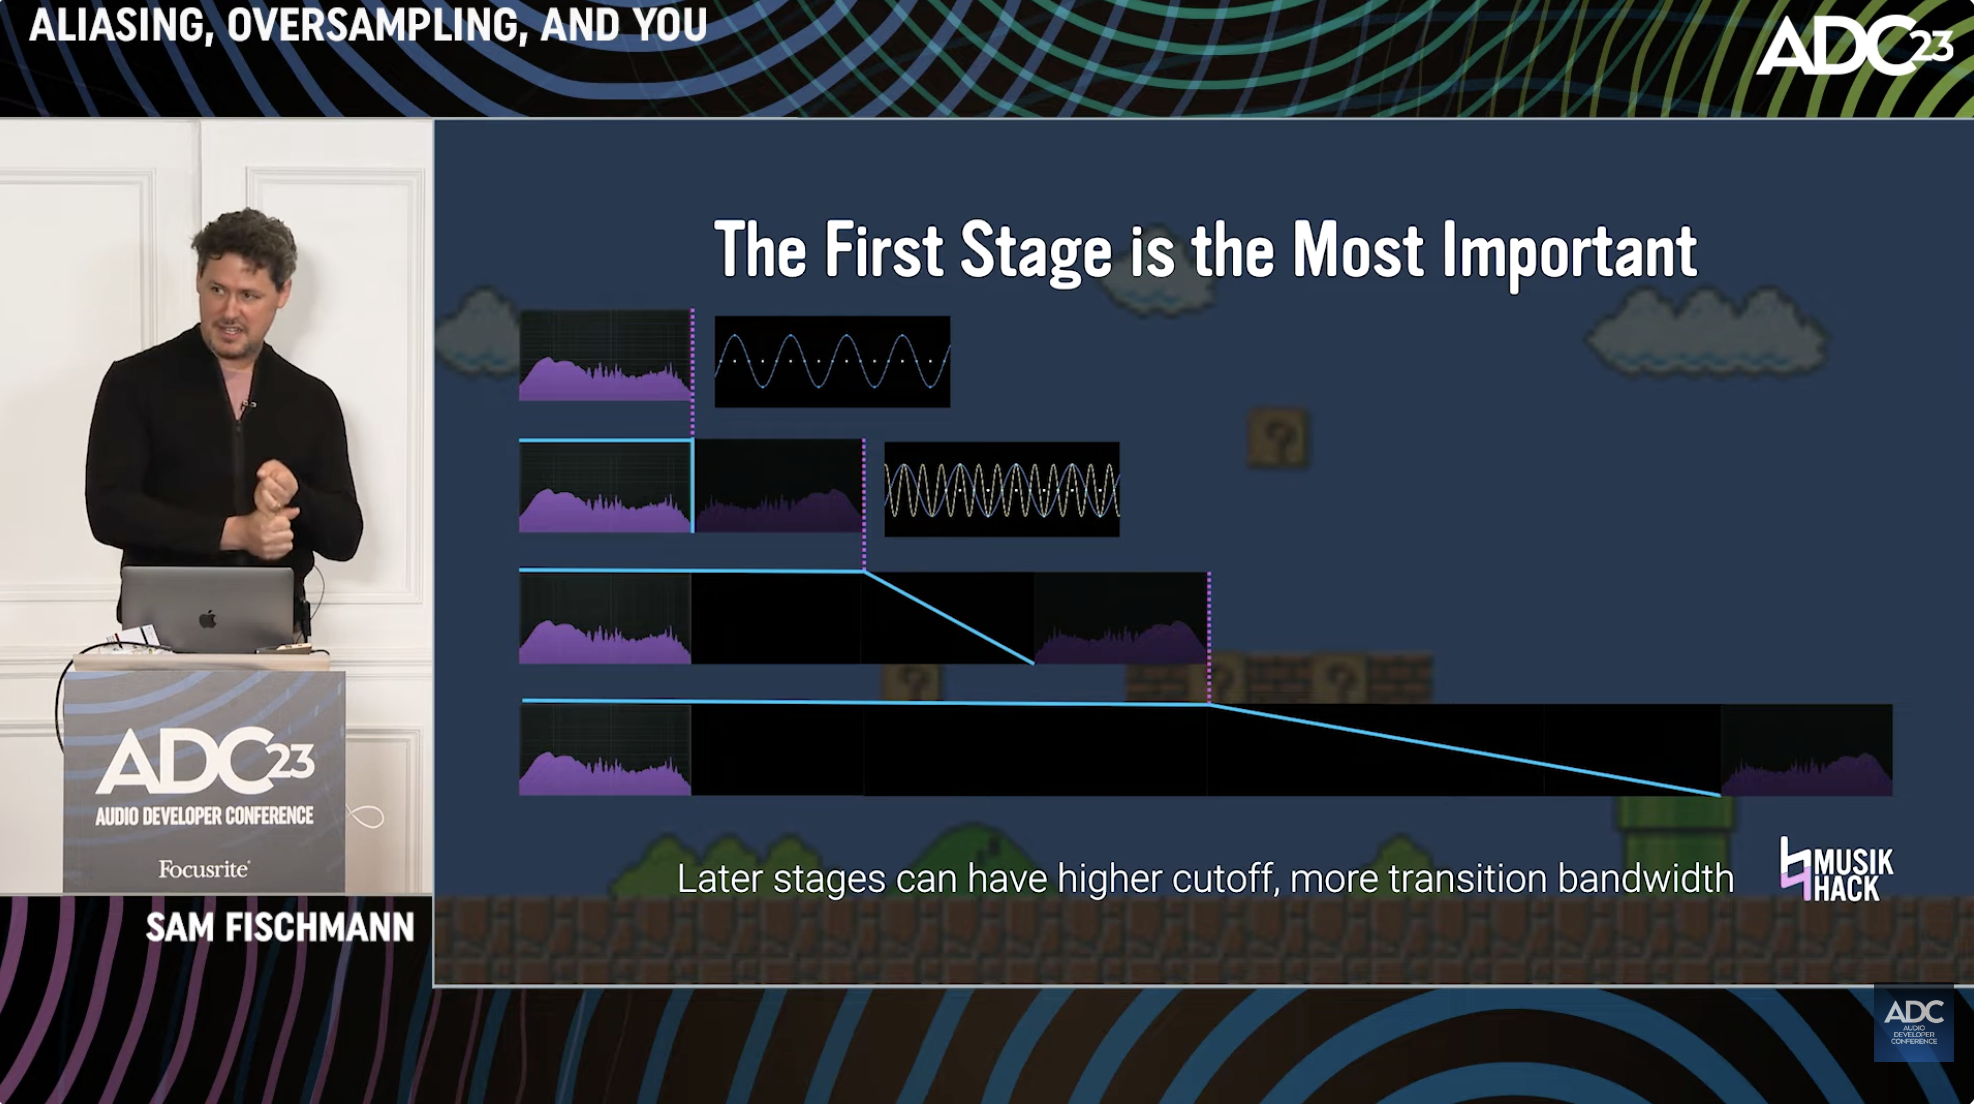
Method 1: Traditional Oversampling
Another way of thinking about oversampling is that you’ve got a lower resolution input that you’re trying to write onto very high resolution output. A continuous signal is the highest resolution of all because you can zoom in forever, so if a low-pass reconstruction filter works for a DAC, why can’t it work for oversampling? Here we go:
- Insert a 0 (zero) sample between each sample in the signal, doubling the sampling rate. This is called zero-padding.
- Run the signal through a low-pass filter to fill in all the padding (interpolation).
- Repeat as many times as you want. Each pass is an oversampling “stage.”
- Do non-linear processing to the oversampled signal.
- Just like an ADC, run the high-resolution, oversampled signal through an anti-aliasing low pass filter.
- Remove the extra samples (decimation).
In general, developers pick one of two different filtering methods:
- Infinite Impulse Response (IIR) – cheap compute, low latency, non-linear phase, higher maximum ripple in the signal
- Finite Impulse Response (FIR) – expensive compute, more latency, linear phase, lower maximum ripple in the signal
Beyond that, developers might pick different filter shapes:
- Steep (brick wall)
- FIR – Expensive compute
- IIR – Sharper phase distortion
- Both
- Better aliasing reduction (for the same filter cutoff frequency)
- larger ripple in the signal (higher visible peaks)
- more resonance at the cutoff near Nyquist
- Shallow
- FIR – Cheaper compute
- IIR – Smoother phase response
- Both
- Worse aliasing reduction
- Smaller ripple in the signal (flatter)
- Less resonance at the cutoff near Nyquist
So, you can see why somebody might argue:
“I can make a shallower FIR filter to get linear phase, less CPU, and less resonance around the Nyquist frequency. To do this, I’ll lower my cutoff to 17,000 Hz, nobody can hear that anyway!”
Then again, a different engineer might say:
“All frequencies must be preserved, but who cares about phase? I need the steepest filter with the least latency. That will keep my plugin more versatile for live use, so I’ll use IIR right up at the limit.”
To make matters more complicated, within all this are more decisions, tricks, and ways to combine the filter and resampling together mathematically to save compute power. The filters for each stage may be different, and some will eschew phases altogether, pad a bunch of zeros after each sample, and just low pass filter one time! All these approaches could handle your audio in subtly different ways, whether it’s transients, imaging, aliasing reduction, or simply an inaudible, but measurable difference.
Method 2: Windowed Sinc Interpolation
Remember the Nyquist-Shannon sampling theorem we discussed when talking about sampling? We said then that by turning each sample into a scaled, time-shifted sinc function and summing all the functions, we could reconstruct a continuous signal again. So why don’t we just do that, and then sample from that continuous signal?
We can, but we must approximate the infinitely-long sinc function, because we only have finite computing power. This gets very technical so I’m not going to go into depth here, but the gist of it is:
- Crop the sinc function around zero, say 32 samples before and and after at our sample rate.
- Write a new polynomial function that approximates all the points in that window. This fills in all the gaps between the points to make any position in the window fast to calculate.
- Multiply the result of the polynomial by a function that smooths out its edges to zero. This is called a windowing function, and you may recognize some of their names (Hamming and Blackman-Harris are typical here).
- Explode each individual sample into a copy of this windowed function, scaled and time shifted to the location of each sample, then summing them up and sampling them at any rate we want.
Developers have come up with all sorts of tricks for their windows and sinc approximations, each with their own trade-offs. Some even combine the traditional and windowed sinc approaches!
In Review
I’m not going to enumerate all the methods and decisions. I just want you to know that there are lots of decisions developers make when oversampling. There are good reasons a developer might pick one method over another, but it's probably not worth your time trying to decide what the best kind of oversampling is in general. Instead, it's best to focus on when it's useful, when it gets in the way (which may be specific to one or another plugin), and when it's worth using at all, which we'll get into in part 3!